In the previous post, I updated the sidescroller project with skeletal meshes — meshes that can be posed. In this post we animate those meshes.
As a fun fact, we’re about 4 months into this project and I’ve written about 5600 lines of code. It keeps piling up.
Animations
An animation defines where the \(m\) mesh vertices are as a function of time:
\[\vec{p}_i(t) \text{ for } i \text{ in } 1:m\]
That’s rather general, and would require specifying a whole lot of functions for a whole lot of mesh vertices. We’ll instead leverage the mesh skeletons from the last blog post, and define an animation using a series of poses, also called keyframes:
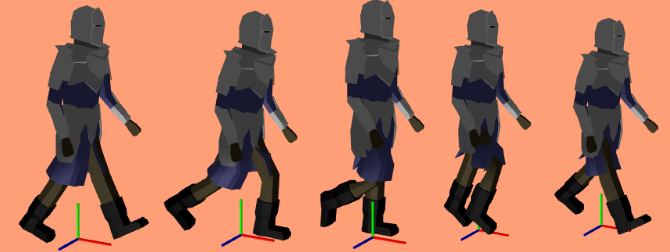
5 keyframes from the walk animation
A single keyframe defines all of the bone transforms that pose the model in a certain way. A series of them acts like a series of still frames in a movie – they act as snapshots of the mesh’s motion over time:
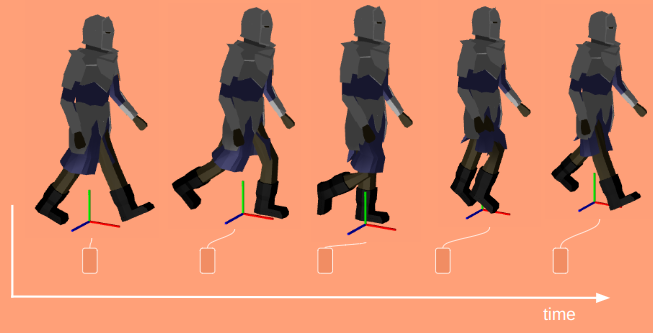
When we’re in-between frames, we have to somehow interpolate between the surrounding frames. The simplest and most common method is linear interpolation, where we linearly blend between the frames based on the fraction of time we are between them:
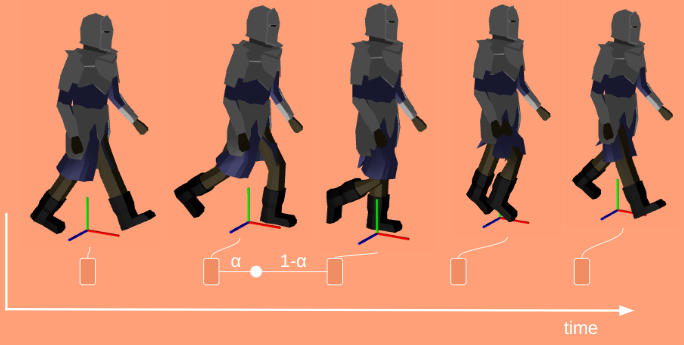
Here \(\alpha\) ranges from 0 at the previous frame and 1 at the next frame:
\[\alpha = \frac{t \> – \> t^{(k)}}{t^{(k+1)} – t^{(k)}}\]
Each frame is a collection of bone transforms. We could interpolate between the transform matrices directly, but it is more common to decompose those into position \(\vec{p}\), orientation \(\vec{q}\), and scale \(\vec{s}\), and interpolate between those instead. If we’re a fraction \(\alpha\) between frames \(f^{(k)}\) and \(f^{(k+1)}\), then the transform components for the \(i\)th bone are:
\[\begin{align} \vec{p}_i(\alpha) & = (1- \alpha) \vec{p}^{(k)}_i + \alpha \vec{p}^{(k+1)}_i \\ \vec{q}_i(\alpha) & = \texttt{slerp}(\vec{q}^{(k)}_i, \vec{q}^{(k+1)}_i, \alpha) \\ \vec{s}_i(\alpha) & = (1- \alpha) \vec{s}^{(k)}_i + \alpha \vec{s}^{(k+1)}_i \end{align}\]
You’ll notice that the position and scaling vectors use linear interpolation, but we’re using spherical linear interpolation for the rotation. This is why we decompose it – basic linear interpolation doesn’t work right for rotations.
Conceptually, animation is super simple. A keyframe just stores some components and a duration:
struct Keyframe {
    f32 duration;
    std::vector<glm::vec3> positions;  // for each bone
    std::vector<glm::quat> orientations;
    std::vector<glm::vec3> scales;
};
and an Animation is just a named list of keyframes:
struct Animation {
    std::string name;
    std::vector<Keyframe> frames;
};
If you want a simple animation, you slap down some spaced-out frames and let interpolation handle what happens in-between. If you want a nice, detailed animation, you can fill out your animation with a higher density of frames, or define special interpolation methods or easing functions to give you a better effect.
Posing a mesh is as simple as interpolating the keyframes and then applying its transforms to the mesh. To do that, its useful to keep track of how long our animation has been playing, and which frames we’re between. To this end we define an AnimationIndex:
struct AnimationIndex {
    f32 t_total;  // elapsed time since the start of the animation
    f32 t_frame;  // elapsed time since the start of the current frame
    int i_frame;  // index of the current frame
};
Advancing the index requires updating our times and the frame index:
AnimationIndex Advance(
    const AnimationIndex& idx,
    f32 dt,
    const Animation& anim)
{
    AnimationIndex retval;
    retval.t_total = idx.t_total + dt;
    retval.t_frame = idx.t_frame + dt;
    retval.i_frame = idx.i_frame;

    const int n_frames = (int)anim.frames.size();
    while (retval.i_frame < n_frames &&
           retval.t_frame > anim.frames[retval.i_frame].duration) {
        retval.t_frame -= anim.frames[retval.i_frame].duration;
        retval.i_frame += 1;
    }

    return retval;
}
The interpolation code almost isn’t worth showing, since its the same as the math:
void Interpolate(
    Keyframe* dst,
    const AnimationIndex& idx,
    const Animation& anim)
{
    int i_lo = idx.i_frame;
    int i_hi = idx.i_frame + 1;
    f32 alpha = 0.0;
    int n_frames = (int)anim.frames.size();
    if (idx.i_frame + 1 >= n_frames) {
        // Animation is done
        i_lo = i_hi = anim.frames.size() - 1;
        alpha = 0.0;
    } else {
        alpha = idx.t_frame / anim.frames[idx.i_frame].duration;
    }

    Interpolate(dst, anim.frames[i_lo], anim.frames[i_hi], alpha);
}
We can use our interpolated keyframe to pose our mesh:
void PoseMeshToAnimationFrame(
    std::vector<glm::mat4>* bone_transforms_curr,
    std::vector<glm::mat4>* bone_transforms_final,
    const Mesh& mesh,
    const Keyframe& frame)
{
    size_t n_bones = bone_transforms_final->size();
    for (size_t i_bone = 0; i_bone < n_bones; i_bone++) {
        glm::vec3 pos = frame.positions[i_bone];
        glm::quat ori = frame.orientations[i_bone];
        glm::vec3 scale = frame.scales[i_bone];

        // Compute the new current transform
        glm::mat4 Sbone = glm::translate(glm::mat4(1.0f), pos);
        Sbone = Sbone * glm::mat4_cast(ori);
        Sbone = glm::scale(Sbone, scale);

        // Incorporate the parent transform
        if (mesh.bone_parents[i_bone] >= 0) {
            const glm::mat4& Sparent =
                (*bone_transforms_curr)[mesh.bone_parents[i_bone]];
            Sbone = Sparent * Sbone;
        }

        // Store the result
        const glm::mat4& Tinv = mesh.bone_transforms_orig[i_bone];
        (*bone_transforms_curr)[i_bone] = Sbone;
        (*bone_transforms_final)[i_bone] = Sbone * Tinv;
    }
}
Adding Animations to the Game
Now that we have animations, we want to integrate them into the sidescroller game. We can do that!
These aren’t beautiful masterpieces or anything, since I clumsily made them myself, but hey – that’s scrappy do-it-to-learn-it gamedev.
We are now able to call StartAnimation on a RigComponent, specifying the name of the animation we want. For example, if the player loses contact with the ground, we can start either the falling or jumping animations with a code snippet like this:
if (!player_movable->support.is_supported) {
    // Fall or Jump!
    StartAnimation(player_rig, jump_pressed ? "jump" : "fall");
    game->player_state_enum = PlayerActionState::AIRBORNE;
}
This looks up the requested animation and sets our animation index to its initial value.
There is one additional thing we need to get right. Instantaneously transitioning to a new animation can look jarring. Watch what happens here were I start punching in the air:
The knight’s legs suddenly snap to their idle positions!
What we’d like instead is to blend seamlessly from the pose the model is at when StartAnimation is called to the poses specified by the new animation. We can already blend between any two poses, so we just leverage that knowledge to blend between the initial pose and the animation pose.
We specify a fadeout time \(t_\text{fadeout}\) whenever we start a new animation. For the first \(t_\text{fadeout}\) seconds of our animation, we linearly interpolate between our initial pose based on how much time has elapsed. If we happen to start in a pose close to what the animation plays from, this effect won’t be all that noticeable. If we happen to start in a wildly different pose we’ll move the mesh over more naturally.
Editing Animations
Animations contain a lot of data. There a multiple frames and a bunch of things bones can do per frame. I didn’t want to specify those transforms in code, nor manually in some sort of textfile.
I made a basic animation editor using ImGUI and used that to craft my animations:
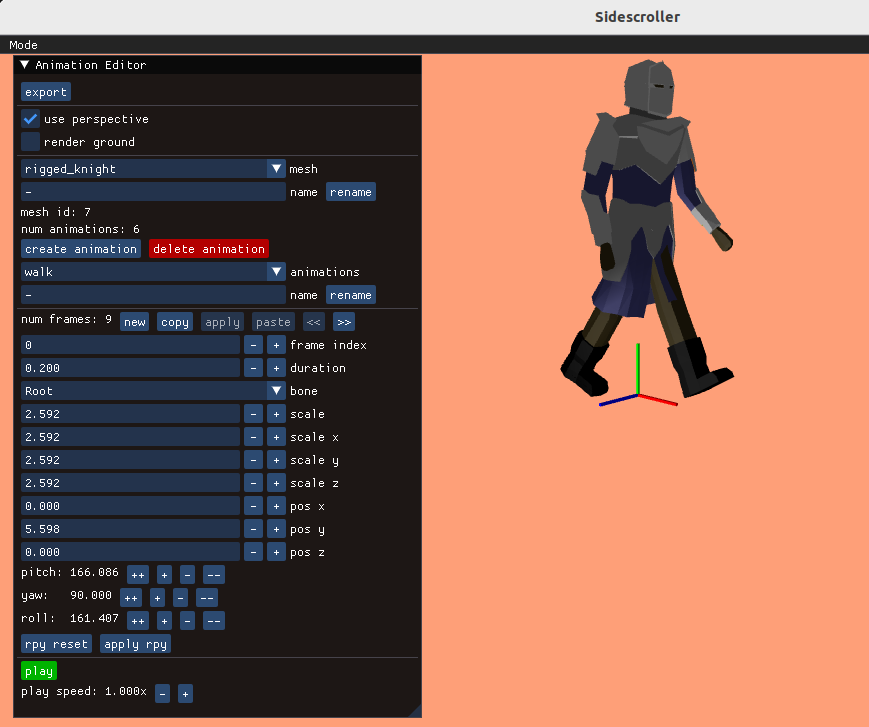
Its fairly rudimentary, but gets the job done.
One could argue that I should have stuck with Blender’s animation tools. There are a few advantages to rolling my own editor:
- Blender doesn’t run on my Linux laptop and keeps crashing
- My model format has somewhat departed from Blender’s
- I want to be able to edit hitspheres and hurtspheres down the road
- My objective is to learn, not turn a profit or release a real game
The right trade-off will of course depend on your unique situation.
Conclusion
Going from pose-able meshes to animations was mainly about figuring out how to tie a bunch of poses together over time. Now that we have that, and a way to cleanly transition between animations, we’re pretty much set.
Animations in big games can be a lot more complicated. We might have overlapping animations for various parts of a mesh, such as facial animations that play simultaneously with body-level animations. We could implement inverse kinematics to help with automatically placing our feet at natural stepping locations (or when climbing to grasp at natural handholds). There are a bunch of fancier techniques that give you tighter control over the mesh too, but at the core of it, what we did here covers the fundamentals.
Next I plan to work on a basic combat system and get some other entities into the game. In order for this to be a proper level, we kind of need that. And maybe we’ll do some ladders.