In the previous post I introduced a new side scroller project, and laid out some of the things I wanted to accomplish with it. One of those points was to render with the graphics card. I had never worked directly with 3D assets and graphics cards before. Unless some high-level API was doing rendering for me under the hood, I wasn’t harnessing the power of modern graphics pipelines.
For TOOM I was not using the graphics card. In fact, the whole point of TOOM was to write a software renderer, which only uses the CPU for graphics. That was a great learning experience, but there is a reason that graphics cards exist, and that reason pretty much is that software renderers spend a lot of time rendering pixels when it’d be a lot nicer to hand that work off to something that can churn through it more efficiently.
Before starting, I thought that learning to render with the graphics card would more-or-less boil down to calling render(mesh). I assumed the bulk of the benefit would be faster calls. What I did not anticipate was learning how rich render pipelines can be, with customized shaders and data formats opening up a whole world of neat possibilities. I love it when building a basic understanding of something suddenly causes all sorts of other things to click. For example, CUDA used to be an abstract, scary performance thing that only super smart programmers would do. Now that I know a few things, I can conceptualize how it works. It is a pretty nice feeling.
Learning OpenGL
I learned OpenGL the way many people do. I went to learnopengl.com and followed their wonderful tutorials. It took some doing, and it was somewhat onerous, but it was well worth it. The chapters are well laid out and gradually build up concepts.
This process had me install a few additional libraries. First off, I learned that one does not commonly directly use OpenGL. It involves a bunch of function pointers corresponding to various OpenGL versions, and getting the right function pointers from the graphics driver can be rather tedious. Thus, one uses a service like GLAD to generate the necessary code for you.
As recommended by the tutorials, I am using stb_image by the legendary Sean Barrett for loading images for textures, and assimp for loading 3D asset files. I still find it hilarious that they can get away with basically calling that last one Butt Devil. Lastly, I’m using the OpenGL mathematics library (glm) for math types compatible with OpenGL. I am still using SDL2 but switched to the imgui_impl_opengl3 backend. These were all pretty easy to use and install — the tutorials go a long way and the rest is pretty self-explanatory.
I did run into an issue with OpenGL where I didn’t have a graphics driver new enough to support the version that learnopengl was using (3.3). I ended up being able to resolve it by updating my OS to Ubuntu 22.04. I had not upgraded in about 4 years on account of relying on this machine to compile the textbooks, but given that they’re out I felt I didn’t have to be so paranoid anymore.
In the end, updating to Jammy Jellyfish was pretty easy, except it broke all of my screen capture software. I previously used Shutter and Peek to take screenshots and capture GIFs. Apparently that all went away with Wayland, and now I need to give Flameshot permission every time I take a screenshot and I didn’t have any solution for GIF recordings, even if login with Xorg.
In writing this post I buckled down and tried Kooha again, which tries to record but then hangs forever on save (like Peek). I ended up installing OBS Studio, recording a .mp4, and then converting that to a GIF in the terminal via ffmpeg:
ffmpeg -ss 1 -i input.mp4 \
  -vf "fps=30,scale=320:-1:flags=lanczos,split[s0][s1];[s0]palettegen[p];[s1][p]paletteuse" \
   -loop 0 2d_to_3d.gif
This was only possible because of this excellent stack overflow answer and this OBS blog post. The resulting quality is actually a lot better than Peek, and I’m finding I have to adjust some settings to make the file size reasonable. I suppose its nice to be in control, but I really liked Peek’s convenience.
Moving to 3D
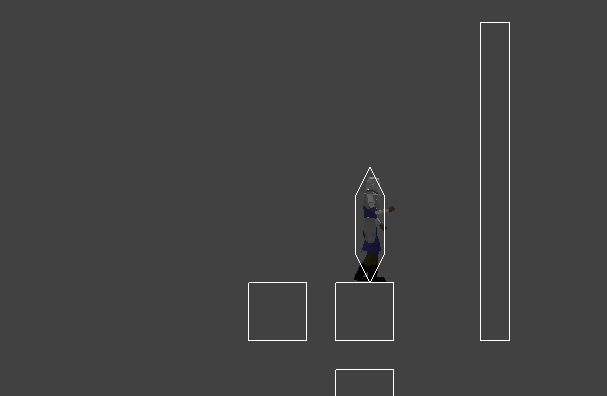
The side scroller logic was all done in a 2D space, but now rendering can happen in 3D. The side scroller game logic will largely remain 2D – the player entities will continue to move around 2D world geometry:
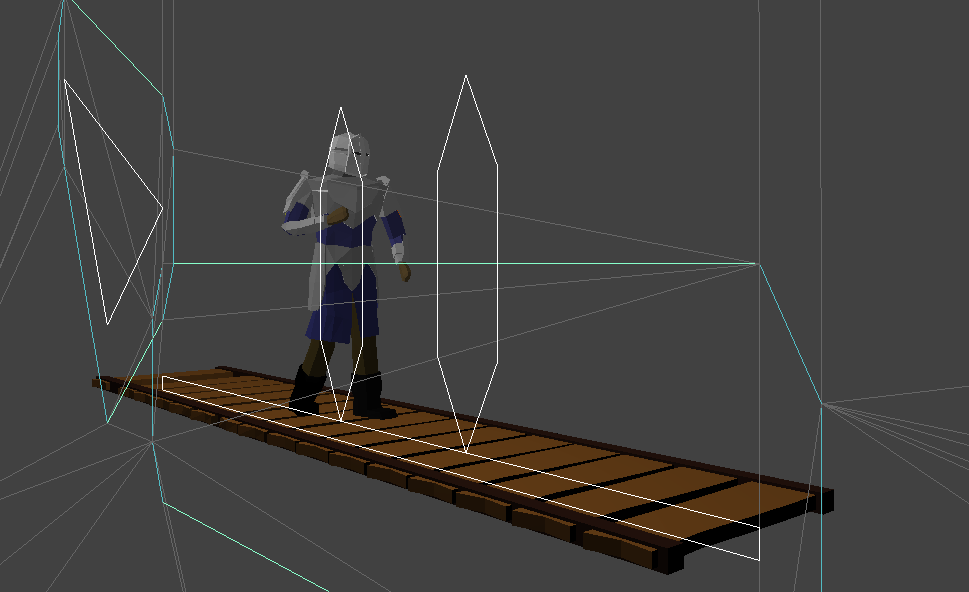
but that 2D world geometry all exists at depth \(z=0\) with respect to a perspective-enabled camera:

Conceptually, this is actually somewhat more complicated than simply calling DrawLine for each edge, which is what I was doing before via SDL2:
for edge in mesh
    DrawLine(edge)
Rendering in 3D requires:
- setting up a vertex buffer and filling it with my mesh data, including color
- telling OpenGL how to interpret said data
- using a vertex shader that takes the position and color attributes and transforms them via the camera transformations into screen space
- using a dead-simple fragment shader that just passes on the received vertex colors
- calling
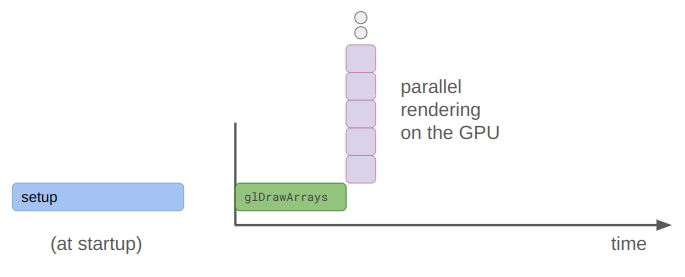
glDrawArrayswith GL_LINES to execute all of this machinery
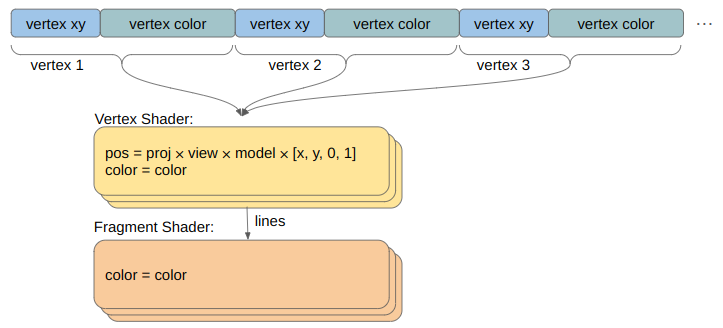
This is not hard to do per se, but it is more complicated. One nice consequence is that there is only a single draw call for all this mesh data rather than a bunch of independent line draw calls. The GPU then crunches it all in parallel:
The coordinate transforms for this are basically what learnopengl recommends:
- an identity model matrix since the 2D mesh data is already in the world frame
- a view matrix obtained via
glm::lookatbased on a camera position and orientation - a projection matrix obtained via
glm::perspectivewith a 45-degree viewing angle, our window’s aspect ratio, and \(z\) bounds between 0.1 and 100:
glm::mat4 projection = glm::perspective(
     glm::radians(45.0f),
     screen_size_x / screen_size_y,
     0.1f, 100.0f);
This setup worked great to get to parity with the debug line drawing I was doing before, but I wanted to be using OpenGL for some real mesh rendering. I ended up defining two shader programs in addition to the debug-line-drawing one: one for textured meshes and one for material-based meshes. I am now able to render 3D meshes!
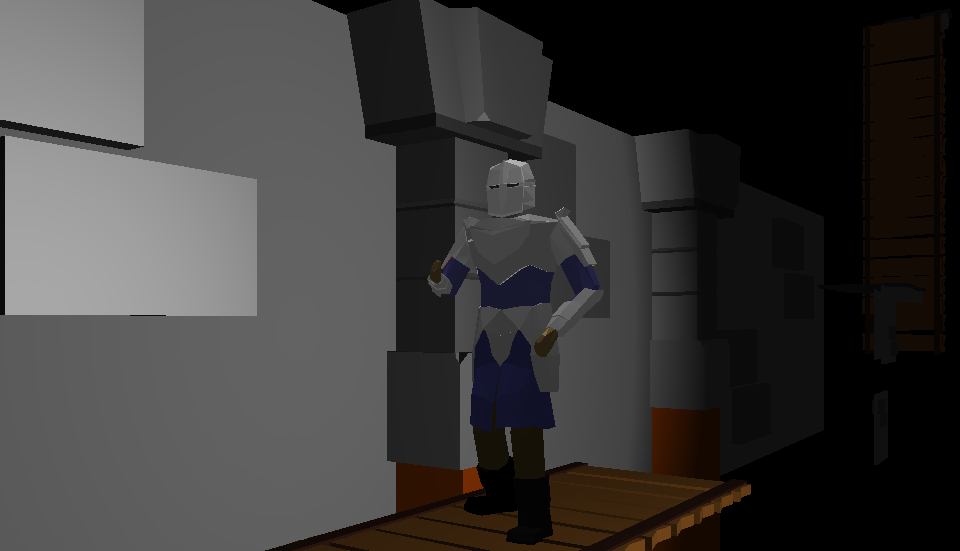
This low-poly knight was created by Davmid, and is available here on Sketchfab. The rest of the assets I actually made myself in Blender and exported to FBX. I had never used Blender before. Yeah, its been quite a month of learning new tools.
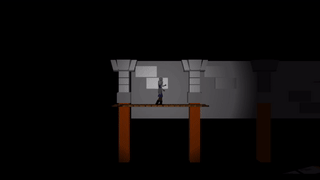
The recording above also includes a flashlight effect. This was of course based on the learnopengl tutorials too.
Rendering with shaders adds a ton of additional options for effects, but also comes with a lot of decisions and tradeoffs around how data is stored. I would like to simplify my approach and end up with as few shaders as possible. For now its easiest for me to make models in Blender with basic materials, but maybe I can move the material definitions to a super-low-res texture (i.e., one pixel per material) and then only use textured models.
Architecture
It is perhaps worth taking a step back to talk about how this stuff is architected. That is, how the data structures are arranged. As projects get bigger, it is easier to get lost in the confusion, and a little organization goes a long way.
First off, the 3D stuff is mostly cosmetic. It exists to look good. It is thus largely separate from the underlying game logic:
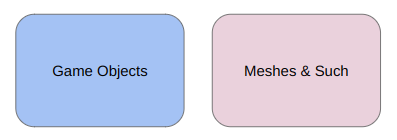
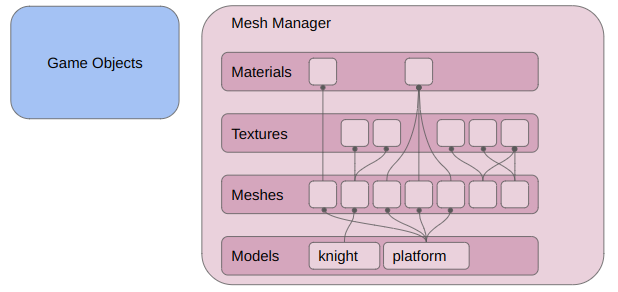
I created a MeshManager class that is responsible for storing my mesh-related data. It currently keeps track of four things:
- Materials – color properties for untextured meshes
- Textures – diffuse and specular maps for textured meshes
- Meshes – the 3D data associated with a single material or texture
- Models – a named 3D asset that consists of 1 or more meshes
I think some structs help get the idea across:
struct Vertex {
    glm::vec3 position;   // location
    glm::vec3 normal;     // normal vector
    glm::vec2 tex_coord;  // texture coordinate
};
struct Material {
std::string name;
glm::vec3 diffuse; // diffuse color
glm::vec3 specular; // specular color
f32 shininess; // The exponent in the Phong specular equation
};struct Texture {
GLuint id; // The OpenGL texture id
std::string filepath; // This is essentially its id
};struct Mesh {
std::string name; // The mesh name
std::vector<Vertex> vertices;
// Indices into `vertices` that form our mesh triangles
std::vector<u32> indices;
// An untextured mesh has a single material, typemax if none.
// If the original mesh has multiple materials,
// the assimp import process splits them.
u16 material_id;
// A textured mesh has both a diffuse and a specular texture
// (typemax if none)
u16 diffuse_texture_id;
u16 specular_texture_id;
GLuint vao; // The OpenGL vertex array object id
GLuint vbo; // The OpenGL vertex buffer id associated with `vertices`
GLuint ebo; // The element array buffer associated with `indices`
};struct Model {
std::string filepath; // The filepath for the loaded model
std::string name; // The name of the loaded model
std::vector<u16> mesh_ids; // All mesh ids
};Visually, this amounts to:
All of this data can be loaded from the FBX files via assimp. In the future, I’ll also be writing this data out and back in via my own game data format.
My game objects are currently somewhat of a mess. I have an EntityManager that maintains a set of entities:
struct Entity {
    u32 uid;  // Unique entity id
    u32 flags;

    common::Vec2f pos;               // Position in gamespace

    // A dual quarter edge for the face containing this position
    core::QuarterEdgeIndex qe_dual;

    u16 movable_id;       // The movable id, or 0xFFFF otherwise
    u16 collider_id;      // The collider id, or 0xFFFF otherwise
};
Entities have unique ids and contain ids for the various resources they might be associated with. For now this includes a movable id and a collider id. I keep those in their own managers as well.
A movable provides information around how an entity is moving. Right now it is just just a velocity vector and some information about what the entity is standing on.
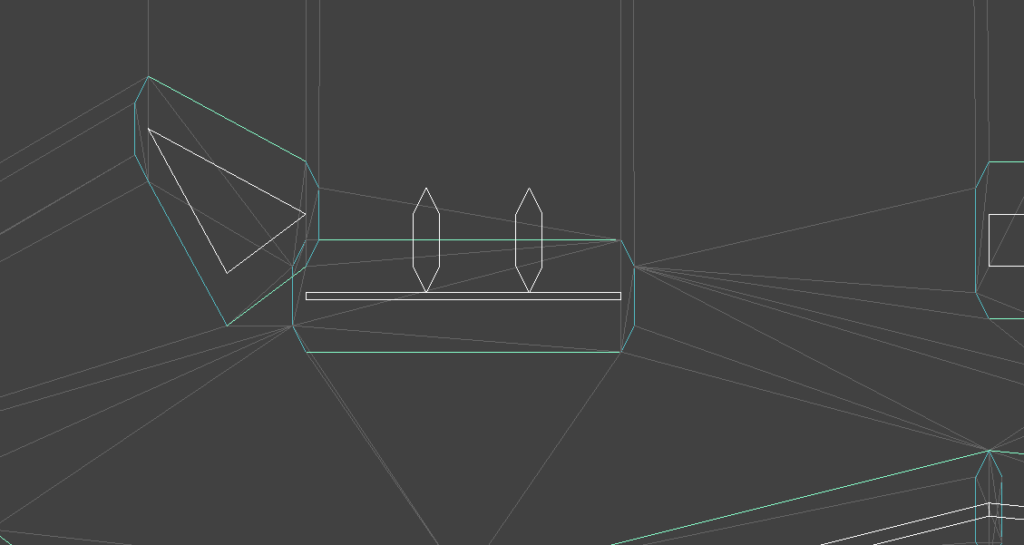
A collider is a convex polygon that represents the entity’s shape with respect to collision with the 2D game world:
The player is the only entity that currently does anything, and there is only one collider size from which the Delaunay mesh is built. I’ll be cleaning up the entity system in the future, but you can see where its headed – it is a basic entity component system.
Editing Assets
I want to use these meshes to decorate my game levels. While I could theoretically create a level mesh in Blender, I would much prefer to be able to edit the levels in-game using smaller mesh components.
I created a very basic version of this using ImGUI wherein one can create and edit a list of set pieces:
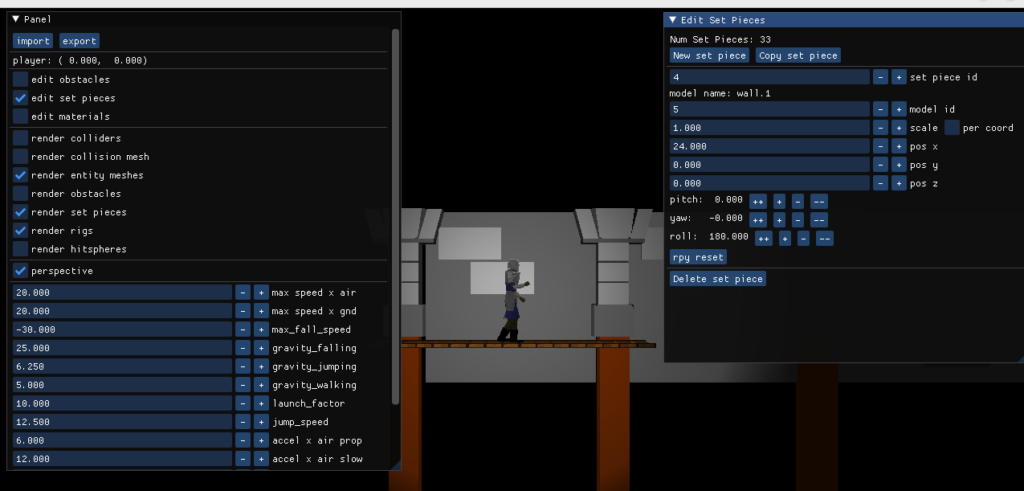
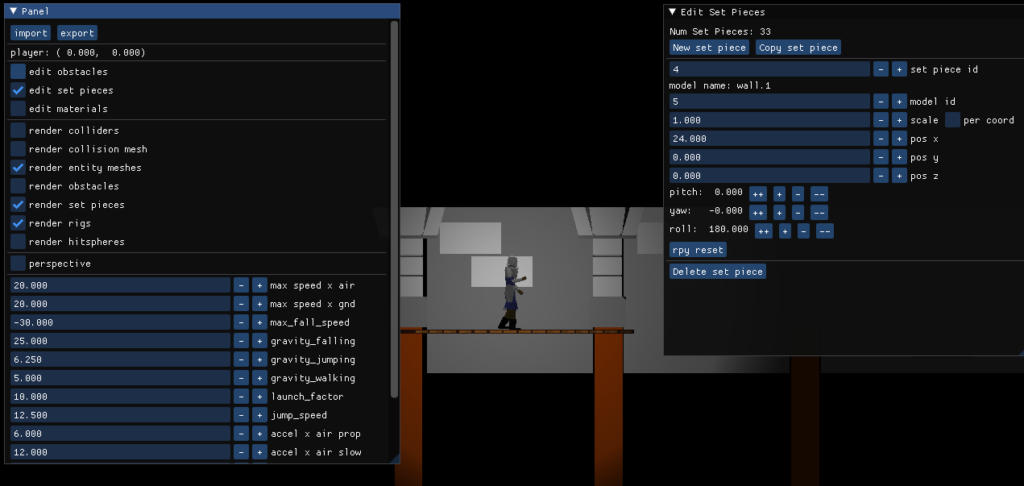
This is leaps and bounds better than editing the level using a text file, or worse, hard-coding it. At the same time, it is pretty basic. I don’t highlight the selected set piece, I don’t have mouse events hooked up for click and drag, and my camera controls aren’t amazing. I do have some camera controls though! And I can set the camera to orthographic, which helps a lot:
The inclusion of this set piece editor meant that I needed a way to save and load game data. (You can see the import and export buttons on the top-left). I went with the same WAD-file-like approach that I used for TOOM, which is a binary finally consisting of a basic header, a list of binary blobs, followed by a table of contents:
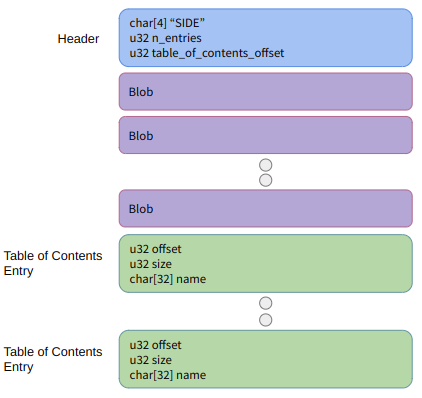
Each blob consists of a name and a bunch of data. It is up to me to define how to serialize or deserialize the data associated with a particular blob type. Many of them just end up being a u32 count followed by a list of structs.
One nice result of using a WAD-like binary is that I don’t always have to copy the data out to another data structure. With TOOM, I was copying things out in the C++ editor but was referencing the data as-is directly from the binary in the C code that executed the game. Later down the road I’ll probably do something similar with a baked version of the assets that the game can refer to.
There are some tradeoffs. Binary files are basically impossible to edit manually. Adding new blob types doesn’t invalidate old save files, but changing how a blob type is serialized or deserialized does. I could add versions, but as a solo developer I haven’t found the need for it yet. I usually update the export method first, run my program and load using the old import method, export with the new method, and then update my import method. This is a little cumbersome but works.
With TOOM I would keep loading and overwriting a single binary file. This was fine, but I was worried that if I ever accidentally corrupted it, I would have a hard time recreating all of my assets. With this project I decided to export new files every time. I have a little export directory and append the timestamp to the filename, ex: sidescroller_2023_12_22_21_28_55.bin. I’m currently loading the most recent one every time, but I still have older ones available if I ever bork things.
Conclusion
This post was a little less targeted than normal. I usually talk about how a specific thing works. In this case, I didn’t want to re-hash how OpenGL works, and instead covered a somewhat broad range of things I learned and did while adding meshes to my game project. A lot of things in gamedev are connected, and by doing it I’m learning what the implications of various decisions are and oftentimes, why things are as they are.
There are a lot of concepts to learn and tools to use. The last month involved:
- OpenGL
- GLAD
- assimp
- stb_image
- Blender
- OBS Studio
- textures
- Phong lighting
- shaders
- …
I am often struck by how something foreign and arcane like using a GPU seems mysterious and hard to do from the outset, but once you dive in you can pull back the curtains and figure it out. Sure, I still have a ton to learn, but the shape of the thing is there, and I can already do things with it.
Happy coding, folks.